

Top
Author
Published
17 Apr 2024Form Number
LP1928PDF size
26 pages, 2.1 MBSubscribed to LP1928.
Thank you for your feedback.
Abstract
This paper describes the complete concept and process of setting up an NVIDIA GPU-based server for AI software deployment from both hardware and software perspectives. It describes all the software packages necessary for running AI software tasks and provides the detailed steps for installing them on the Lenovo ThinkSystem SD650-N V3 server configured with NVIDIA H100 GPUs.
In addition, this paper discusses the benefits of software development based on the existing open software resources, and moreover, it provides the implementation details of a typical AI application based on open software resources, running on top of the aforementioned software packages.
This paper is aimed at those who needs to know the full process of setting up NVIDIA GPUs server hardware and preparing the whole AI software to run on the server. We expect readers to be familiar with Linux OS, commands, and scripts; to have a basic understanding of docker and container technologies; and a basic understanding of AI development and deployment processes.
Introduction
Setting up a server with NVIDIA GPUs to run AI machine learning and inference workloads is a non-trivial process, especially if this is your first time to do this. There are compatibility issues need to consider and pitfalls need to avoid.
This paper describes the detailed process starting with hardware and firmware setup and concluding with the AI framework deployment. This paper is suitable for laboratory engineers or anyone who needs to know the full process of setting up the server hardware and prepare the AI software to run on the server.
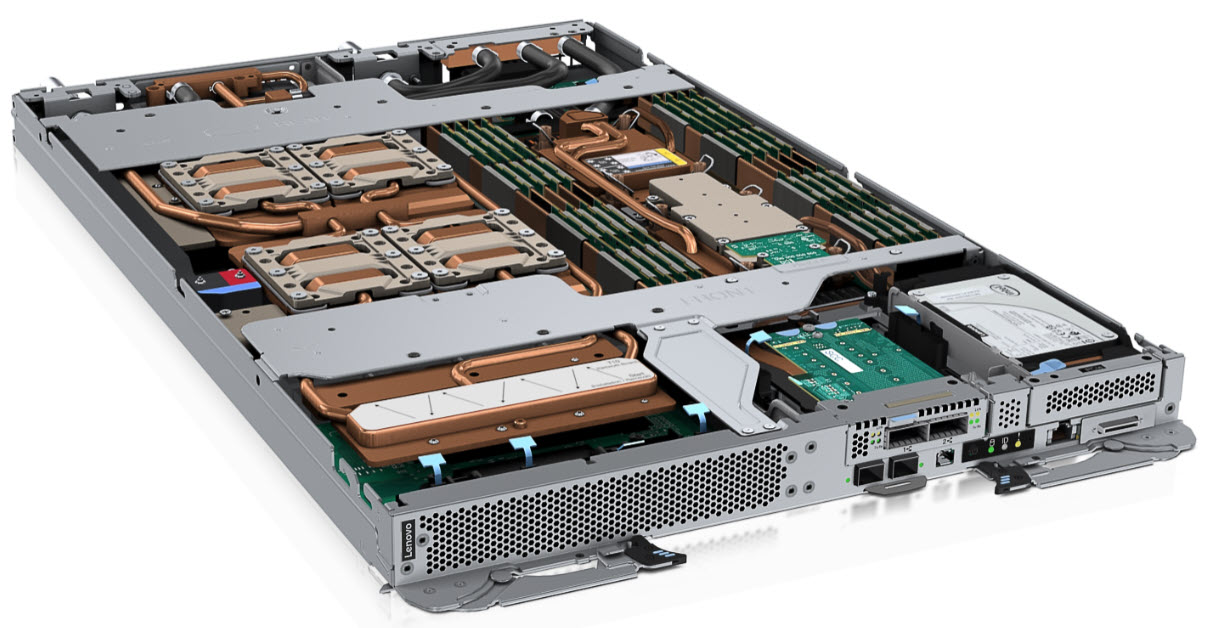
Figure 1. The ThinkSystem SD650-N V3 server tray with two processors (right) and four NVIDIA H100 SXM5 GPUs (left)
For our lab enviroinment, we are using a Lenovo ThinkSystem SD650-N V3 configured with NVIDIA H100 GPUs. For information on these products, refer to related Lenovo and NVIDIA web pages:
- Lenovo ThinkSystem SD650-N V3:
- Datasheet: https://lenovopress.lenovo.com/datasheet/ds0174
- Product Guide: https://lenovopress.lenovo.com/lp1834
- NVIDIA H100 Tensor Core GPU Architecture
Architecture
In this section, we introduce the architecture of the Lenovo ThinkSystem SD650-N V3 and the NVIDIA H100 configuration from the hardware and software perspective.
From the hardware perspective, we describe the high-level architecture of the Lenovo ThinkSystem SD650-N V3 and NVIDIA H100 and explain how the computing node and GPU node are physically connected and communicating to each other.
From the software perspective, we describe briefly about the full software stack from NVIDIA and other organization, from firmware, driver, Docker engine and CUDA toolkit, AI application framework container and then Jupyter Notebook, etc. The details for setting up and running all the required software packages will be discussed in the next sections.
Topics in this section:
Hardware perspective
Lenovo ThinkSystem SD650-N V3 is a 1U water-cool system, consisting of half-width Intel Xeon Scalable computing node on the right and half-width NVIDIA H100 GPU node on the left. It’s installed into the 6U DW612s chassis, and furthermore, up to six SD650-N V3 server trays can be installed in the DW612S 6U enclosure.
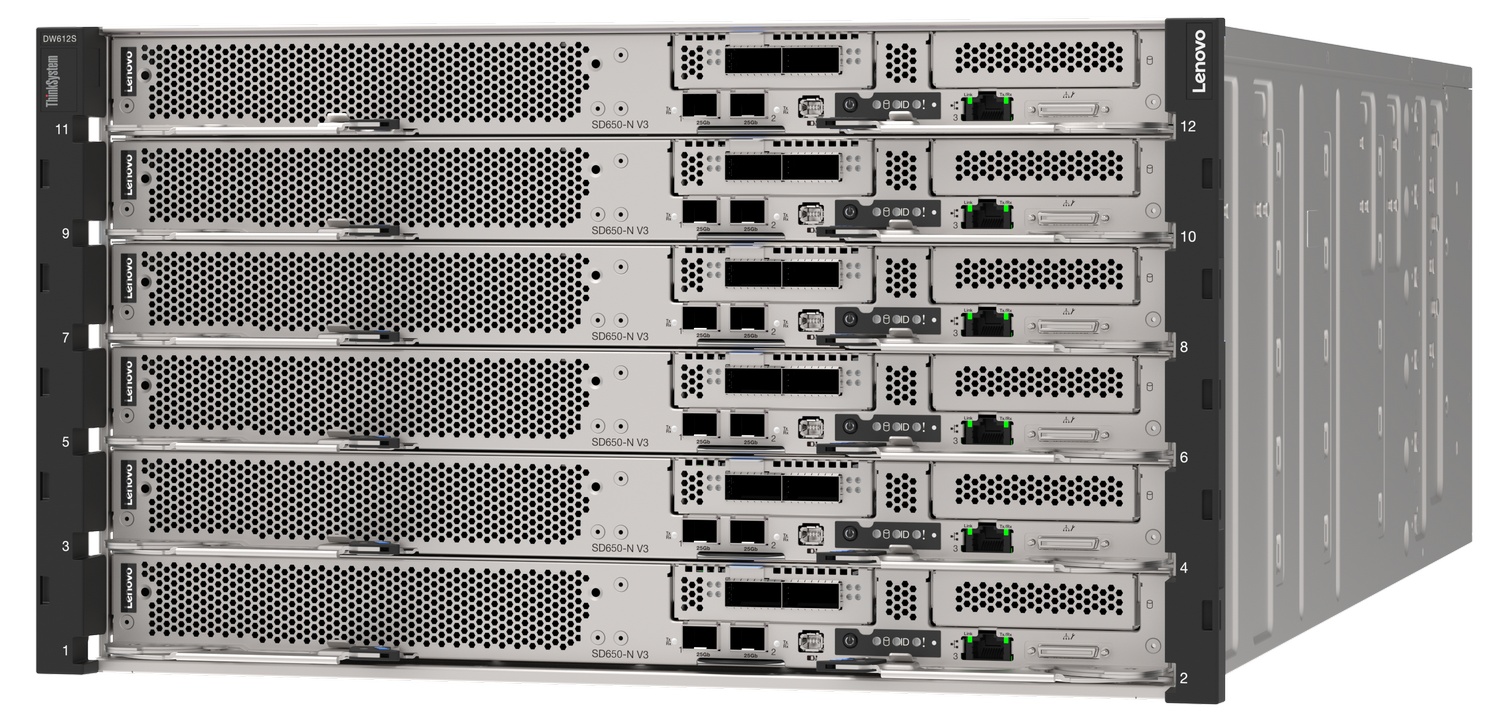
Figure 2. Lenovo ThinkSystem DW612S 6U enclosure
H100 is NVIDIA’s 9th-generation data center GPU designed to deliver an order-of-magnitude performance leap for large-scale AI and HPC over NVIDIA’s prior generation NVIDIA A100 Tensor Core GPU. It is designed based on the NVIDIA Hopper GPU architecture. The figure below shows the NVIDIA H100 GPU on a SXM5 Module.
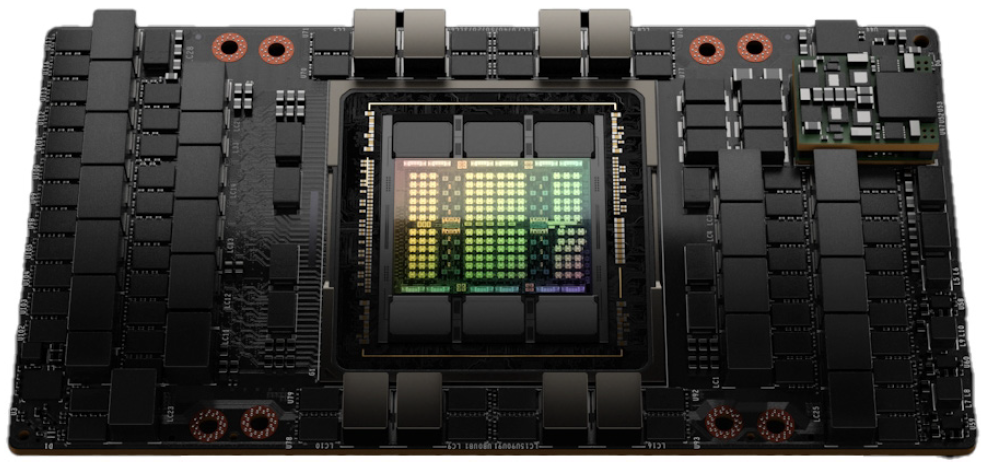
Figure 3. NVIDIA H100 GPU on the SXM5 Module
Each NVIDIA H100 GPU node on the left side of ThinkSystem SD650-N V3 server tray contains four SXM5 Modules. In the SD650-N V3 (Figure 1), the Intel Xeon computing node is located on the right of the server tray and the NVIDIA H100 GPUs are on the left of the server tray. The computing node and GPUs are inter-connected with four PCIe 5.0 x16 cables, as shown in the figure below.
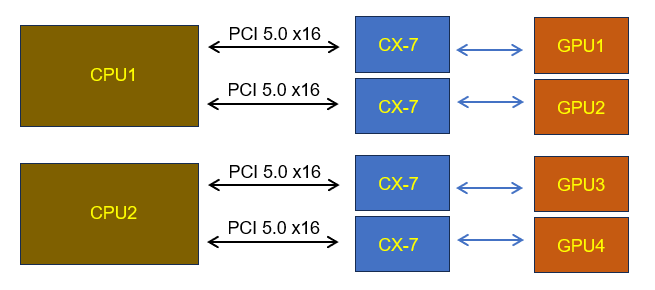
Figure 4. Inter-connections between Intel Xeon computing node and NVIDIA H100 GPU node
Software perspective
From the software perspective, the software stack required for running an AI application (running on NVIDIA GPUs), for training or inference, will include at least the following software packages:
- NVIDIA GPU Firmware
The NVIDIA H100 SXM5 GPU modules are located behind the NVIDIA ConnectX-7 chips and are indirectly connected to CPU, as shown in figure 4. The ConnectX-7 firmware helps to discover, initialize, and enumerate the GPU modules correctly in the PCIe configuration space at the system boot time, and after this, the GPU modules will show up on the PCI-E bus.
- NVIDIA GPU OS Kernel Space CUDA driver
NVIDIA GPU device driver (nvidia.ko) is the OS kernel-mode device driver for the NVIDIA GPUs.
- NVIDIA GPU (user mode) CUDA Toolkit
User-mode SDK is used to build CUDA applications. The package also includes useful applications to check the GPU status (nvidia-smi), and user-mode driver (libcuda.so) used to run CUDA applications.
- Docker Engine
As there exist several deep learning libraries and deep learning frameworks which different users can simultaneously utilize in the same server, as well as complex dependencies of these frameworks on the libraries and drivers, it is strongly recommended to use docker-container technology to separate the user applications and to decouple the complex dependencies on the underlying hardware. As such, installing docker engine on the GPU server usually is necessary and this avoids the incompatibilities in the future.
- NVIDIA CUDA Container Toolkit
The NVIDIA Container Toolkit enables users to build and run GPU-accelerated containers. The toolkit includes a container runtime library and utilities to automatically configure Docker Engine and containers to leverage NVIDIA GPUs.
- AI Application Container
An AI application container comes with all the dependent system libraries, software packages, configuration settings and even specific workloads for that specific application purpose. This makes the deployment and running of a specific application from one computing environment to another very quick and reliable. NVIDIA and other companies as well as several organizations provide AI application container images for public use, which can accelerate the development and deployment conveniently.
- Jupyter Notebook
This software package is optional, but it provides convenient web-based interactive development environment for notebooks, code, and data development, so it is highly recommended to also install this package:
In view of the complexity of the above software stacks, NVIDIA provides the necessary software packages supporting the AI and data science related workloads that will be running on NVIDIA GPUs. The figure below illustrates the software packages.

Figure 5. NVIDIA provides software packages and their relations (nvidia.com)
For an overview of NVIDIA ’s software packages, please refer to the following NVIDIA page:
https://docs.nvidia.com/datacenter/cloud-native/container-toolkit/latest/index.html
The table below summarizes the purpose of each software package.
| Layer | Object | Purpose Description |
|---|---|---|
| Container | Application Container | A container is a containerized application that runs on top of the Docker engine which provides a computing environment that is separate reliably from other applications. Furthermore, application deployment is significantly faster compared to traditional methods, as we no longer need to install all dependent libraries or perform necessary configurations; they are all included in the container image. |
| CUDA Container Toolkit | NVIDIA CUDA Container Toolkit | It provides the runtime library to access the Nvidia GPU computing service in the docker-container environment |
| Docker | Docker Engine | It supports the execution and separation of containers.
The docker technology provides application specific user space that contains all the dependent system libraries, software packages, configuration settings and specific workloads for a specific application. This makes deployment and running of a specific application from one computing environment to another very quick and reliable. |
| (User mode) CUDA Toolkit | NVIDIA libraries, runtime and tools. | User-mode SDK is used to build CUDA applications.
The package also includes useful applications to check the GPU status: nvidia-smi and user-mode driver: libcuda.so |
| OS Kernel Space CUDA driver | NVIDIA GPU Device Driver | OS Device driver for the NVIDIA GPU: nvidia.ko |
| Firmware | NVIDIA GPU Firmware | Firmware to initialize and enumerate the NVIDIA GPUs |
| Hardware | NVIDIA GPUs and Lenovo ThinkSystem servers with NVIDIA GPUs | Physical devices |
Setting up the required software packages
As briefly described in the Architecture section, the AI Workload requires a set of software packages:
- GPU firmware
- GPU driver
- Docker engine
- CUDA container toolkit
- AI application framework container
- Jupyter Notebook (optional)
This section will provide the details for setting up all these software packages. Though the Jupyter Notebook is optional, we will also install it, as it provides a convenient web-based interactive development environment, which is useful and common in the AI or data science software development area.
Topics in this section:
1. Disable the nouveau video driver
The server should be installed with Ubuntu 22.04 server OS with HWE kernel. We do not go into the OS installation details here.
Detailed information about the Ubuntu server OS can be found at this page:
https://ubuntu.com/server
If you meet any issue (such as no screen output) when installing the OS, it is possible the OS’ native graphic driver nouveau is incompatible with the latest NVIDIA GPU and is causing the problem. If so, nouveau needs to be blacklisted before the OS installation and during the GPU driver installation.
Blacklisting the nouveau driver can be done with the following steps:
- During the OS installation time or boot time, when the GRUB boot menu shows up, move the up or down key to the HWE kernel, and press ‘e’ to edit the kernel command line, as in the picture below:
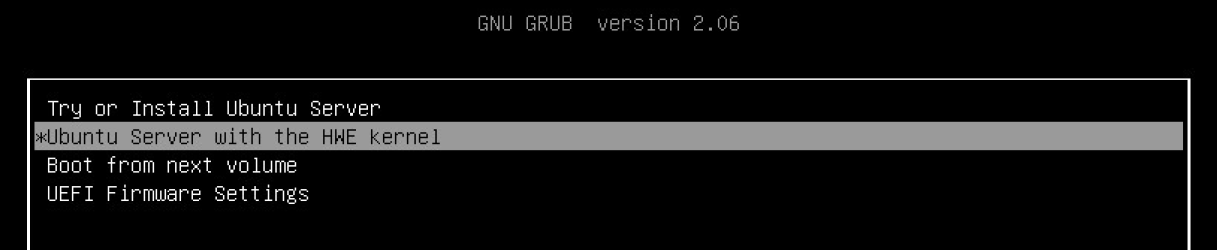
Figure 6. Select and edit HWE kernel in the GNU GRUB boot menu - Add the following two parameters to the linux kernel command line, as shown in the picture below:
rdblacklist=nouveau nouveau.modeset=0
Figure 7. Add two parameters in the linux kernel command line to blacklist the “nouveau” module - Press Ctrl-x or F10 to install or boot the OS
Note that the above operation only takes effect for one OS boot. For permanent effect, we still need to blacklist nouveau module as in the step below.
- Disable (blacklist) the nouveau driver when in the OS
If your OS has not installed the dracut package yet, install it first by following the steps below:
$ sudo apt-get update
$ sudo apt-get install dracut
Generate a new initramfs/initrd image without the nouveau driver:
$ sudo mv /boot/initrd.img-$(uname -r) /boot/initrd.img-$(uname -r)-nouveau
$ sudo dracut --force --omit-drivers nouveau /boot/initrd.img-$(uname -r) $(uname -r)
$ sudo init 3
Now the OS runs into runlevel 3 and nouveau is disabled.
2. Update device firmware
You can go directly to 3. Install the NVIDIA GPU driver and the full CUDA toolkit if no firmware update is required. We recommend you only upgrade GPU firmware if recommended by Lenovo support.
Both the GPU and ConnectX-7 firmware should have already been updated to the latest versions when the server was shipped from the Lenovo factory. Verify that the GPUs are listed on the PCIe bus interface, by checking the XCC (BMC) web GUI from the server, as shown in the figure below.
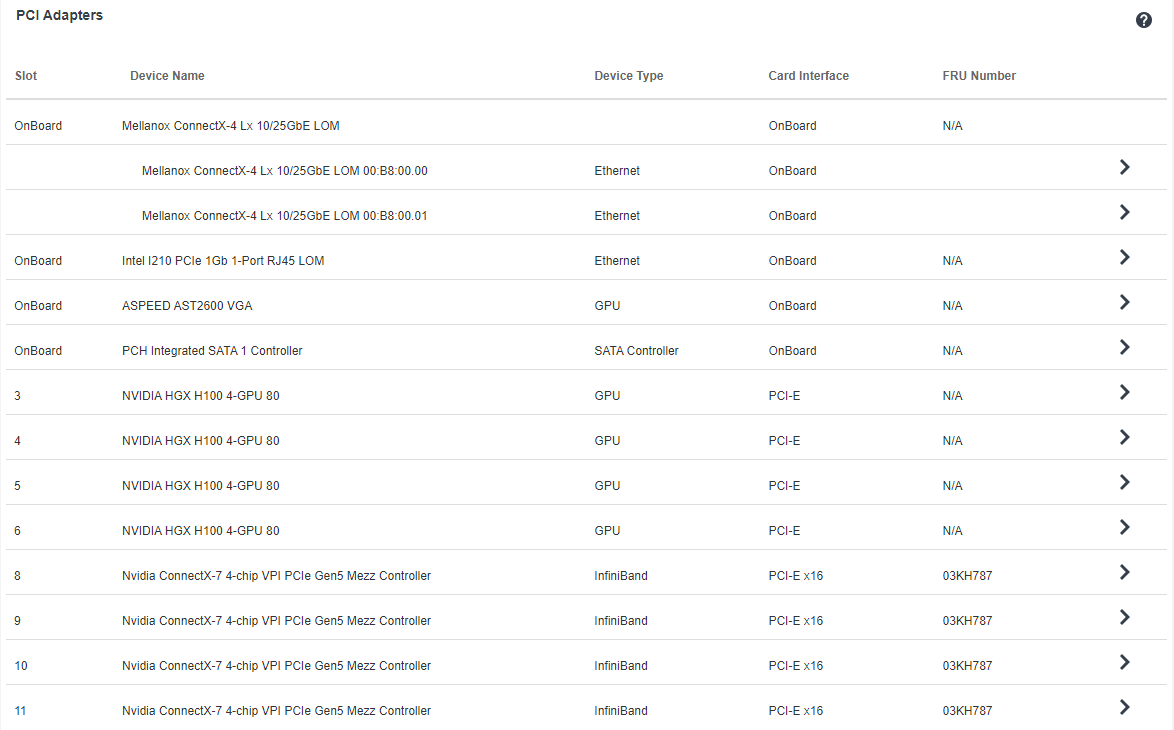
Figure 8. NVIDIA H100 GPUs are visible in the PCIe bus interface
If you did not see the correct layout of the GPUs on the PCIe bus interface, you may need to update the ConnectX-7 firmware for it to correctly manage GPUs.
To update the ConnectX-7 firmware, follow the steps below:
- download and install mst tool (NVIDIA Firmware Tools, MFT) from the following page:
https://docs.nvidia.com/networking/display/mftv4250/user+manual - Download the latest ConnectX-7 firmware for use with the Lenovo ThinkSystem server. In our testing, we used the following firmware:
fw-ConnectX7-rel-28_38_1002-SN37B23797_SN37B23798_Ax-UEFI-14.31.20-FlexBoot-3.7.201.signed.bin
- Install and then start mst with the command:
$ sudo mst start - check mst status:
$ sudo mst status - You will see 4 mst managed devices associated with CX7 adapters:
/dev/mst/mt4129_pciconf0 /dev/mst/mt4129_pciconf1 /dev/mst/mt4129_pciconf2 /dev/mst/mt4129_pciconf3 - Flash the firmware for all the four ConnectX-7 devices with the commands below:
$ sudo sudo flint -d /dev/mst/mt4129_pciconf0 -i fw-ConnectX7-rel-28_38_1002-SN37B23797_SN37B23798_Ax-UEFI-14.31.20-FlexBoot-3.7.201.signed.bin b $ sudo sudo flint -d /dev/mst/mt4129_pciconf1 -i fw-ConnectX7-rel-28_38_1002-SN37B23797_SN37B23798_Ax-UEFI-14.31.20-FlexBoot-3.7.201.signed.bin b $ sudo sudo flint -d /dev/mst/mt4129_pciconf2 -i fw-ConnectX7-rel-28_38_1002-SN37B23797_SN37B23798_Ax-UEFI-14.31.20-FlexBoot-3.7.201.signed.bin b $ sudo sudo flint -d /dev/mst/mt4129_pciconf3 -i fw-ConnectX7-rel-28_38_1002-SN37B23797_SN37B23798_Ax-UEFI-14.31.20-FlexBoot-3.7.201.signed.bin b - Reboot the server.
$ sudo init 6
For more information about the NVIDIA device firmware update process, see the following pages:
https://docs.nvidia.com/networking/display/mftv4250/flint+%E2%80%93+firmware+burning+tool
https://docs.nvidia.com/dgx/dgxh100-fw-update-guide/about.html
3. Install the NVIDIA GPU driver and the full CUDA toolkit
The NVIDIA GPU OS kernel space device driver, user space drivers and runtime libraries, tools, utilities and sample source codes, are all packaged within the NVIDIA GPU CUDA Toolkit. They are the necessary and integral part of software components for providing the NVIDIA GPU services to the upper layer applications that run in the OS user space.
Follow the steps below to install the NVIDIA GPU CUDA Toolkit and verify the successful installation:
- Install gcc (and build-essential ) in the OS
We need to install the gcc compiler tool chain first, as it is required during the NVIDIA GPU driver installation, using the command below to install this package:
$ sudo apt install build-essential
- Download NVIDIA GPU driver and all related user utilities (nvidia-smi, etc)
To search and download the NVIDIA GPU driver and related user utilities software package, visit the NVIDIA Driver Downloads site via the link below, and select H100 and the target OS as in figure 9 to locate the corresponding H100 GPU driver for the target OS, as in figure 10.
https://www.nvidia.com/download/index.aspx
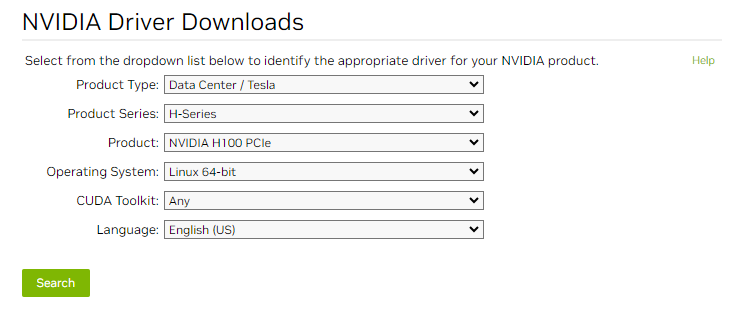
Figure 9. NVIDIA Driver Downloads details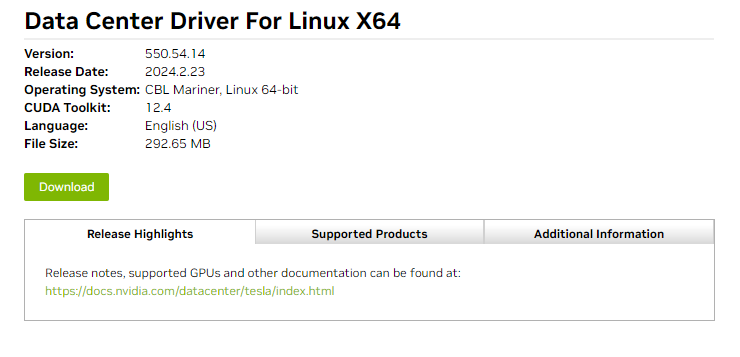
Figure 10. A specific NVIDIA Driver version for downloadUsing the latest version of NVIDIA GPU driver is highly recommended. At the time of writing, the latest version was v550.54.14, released in February 2024. Download it to a local folder.
- Switch to text mode console first if not yet in this mode, with the command below:
$ init 3 - Run the command below to install all the CUDA toolkit:
$ sudo ./NVIDIA-Linux-x86_64-xxx.yyy.zz.runxxx.yyy.zz is the versioning of the NVIDIA driver, such as 535.104.12 (as shown below). Note that, in addition to the kernel driver, this toolkit package also includes all the user-mode SDK and utilities, and executing the above command will install all these components.
- Run the command below to check if installation is successful:
$ nvidia-smiIf the CUDA toolkit package is installed correctly, the information below for all GPUs will be displayed:
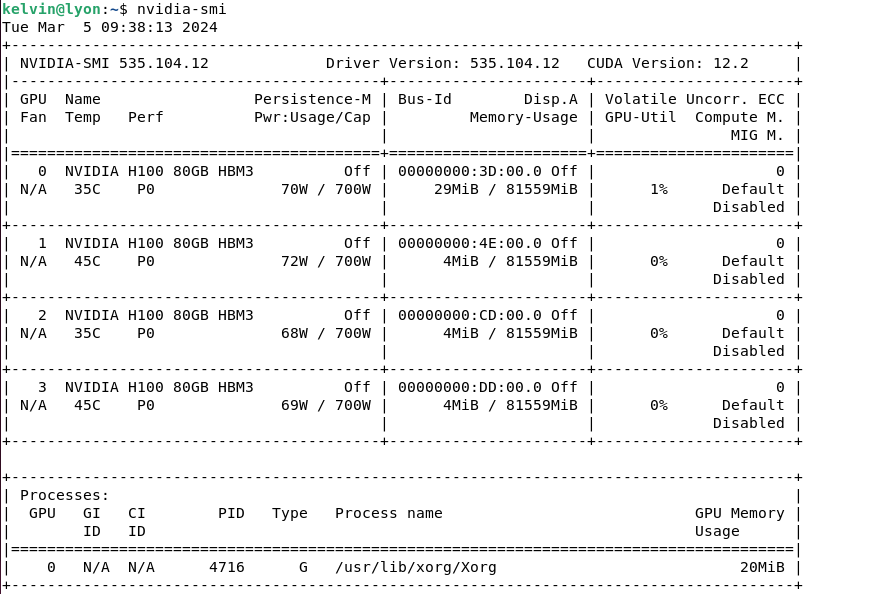
Figure 11. nvidia-smi command output from OS user spaceIf you want to uninstall this version of driver (for example, before upgrading to a newer driver), simply run:
$ sudo nvidia-uninstall - Install the Graphical User Interface (GUI) for Ubuntu 22 server OS
A remote desktop GUI environment will be helpful for remote users to use the GUI based web browser in the server OS such as the Google Chrome, which will be used with Jupyter Notebook. As such, we will install the xrdp GUI on the Ubuntu server OS.
To install the GUI for Ubuntu 22 Server OS, using below commands to install xrdp:
$ apt install ubuntu-desktop-minimal -y
$ apt install xrdp -y
$ systemctl status xrdp
Details about the xrdp GUI can be found at the following page:
https://www.layerstack.com/resources/tutorials/How-to-install-Graphical-User-Interface-GUI-for-Ubuntu-22-Cloud-Servers
4. Install Docker Engine on Ubuntu OS
There are several technologies that provide solutions for running containerized applications on Linux OS, such as Docker, Artifactory Docker Registry, LXC, Podman, runC, containerd, etc. In this paper, we choose to use Docker.
To install the Docker engine on the Ubuntu OS, follow the steps below.
- Set up Docker's apt repository
# Add Docker's official GPG key: $ sudo apt-get update $ sudo apt-get install ca-certificates curl $ sudo install -m 0755 -d /etc/apt/keyrings $ sudo curl -fsSL https://download.docker.com/linux/ubuntu/gpg -o /etc/apt/keyrings/docker.asc $ sudo chmod a+r /etc/apt/keyrings/docker.asc # Add the repository to Apt sources: $ echo \ "deb [arch=$(dpkg --print-architecture) signed-by=/etc/apt/keyrings/docker.asc] https://download.docker.com/linux/ubuntu \ $(. /etc/os-release && echo "$VERSION_CODENAME") stable" | \ sudo tee /etc/apt/sources.list.d/docker.list > /dev/null $ sudo apt-get update - Install the Docker packages with the latest version
$ sudo apt-get install docker-ce docker-ce-cli containerd.io docker-buildx-plugin docker-compose-plugin - Verify that the Docker Engine installation is successful by running the hello-world image
# Below command downloads and runs a test container image. It prints a confirmation message and exits.
$ sudo docker run hello-world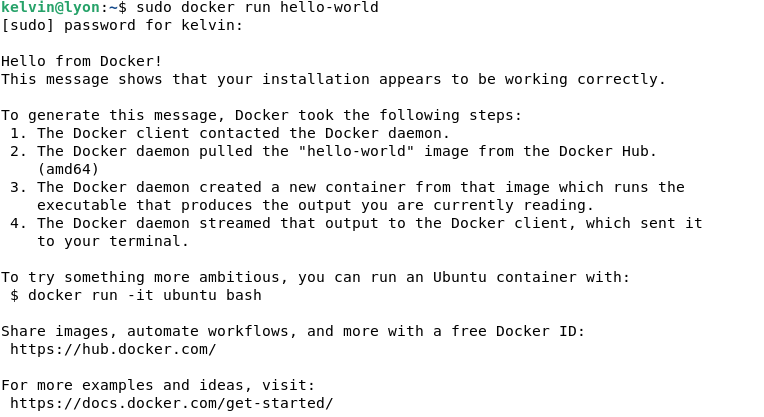
Figure 12. Hello-world message output from the test container image
Once you see the Hello-world confirmation message, the Docker engine is correctly installed.
For more details about the Docker engine usage, please refer to the Docker web site below:
https://docs.docker.com/engine/install/ubuntu/
For comparisons about docker technologies, refer to:
https://jfrog.com/devops-tools/article/alternatives-to-docker/
5. Install NVIDIA CUDA Container Toolkit
The NVIDIA Container Toolkit enables users to build and run GPU-accelerated containers. The toolkit includes a container runtime library and utilities to automatically configure the Docker Engine to leverage the NVIDIA GPUs and provide the NVIDIA GPU computing services to the container applications that run in the docker environment.
Follow the steps below to install this Toolkit and verify the successful installation:
- Get the GPG key and configure the package repository by below commands:
$ distribution=$(. /etc/os-release;echo $ID$VERSION_ID) \ && curl -fsSL https://nvidia.github.io/libnvidia-container/gpgkey | sudo gpg --dearmor -o /usr/share/keyrings/nvidia-container-toolkit-keyring.gpg \ && curl -s -L https://nvidia.github.io/libnvidia-container/$distribution/libnvidia-container.list | \ sed 's#deb https://#deb [signed-by=/usr/share/keyrings/nvidia-container-toolkit-keyring.gpg] https://#g' | \ sudo tee /etc/apt/sources.list.d/nvidia-container-toolkit.list - Install the nvidia-container-toolkit package and its dependencies after updating the package listing:
$ sudo apt-get update $ sudo apt-get install -y nvidia-container-toolkit - Configure the Docker daemon to recognize the NVIDIA Container Runtime:
$ sudo nvidia-ctk runtime configure --runtime=docker - Restart the Docker daemon to complete the installation after setting the default runtime:
$ sudo systemctl restart docker - Test the setup by running a base CUDA container which runs the nvidia-smi command:
$ sudo docker run --rm --runtime=nvidia --gpus all nvidia/cuda:11.6.2-base-ubuntu20.04 nvidia-smi
Now, you should see the output below:
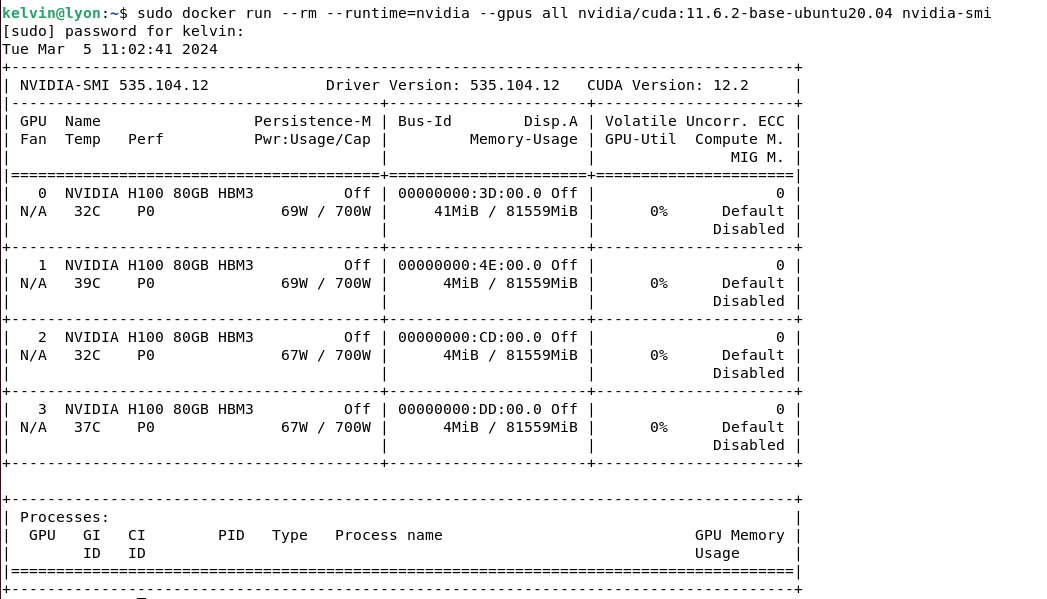
Figure 13. nvidia-smi command output from container image through the Nvidia CUDA Container Toolkit Runtime
For more information, see the NVIDIA Container Toolkit Installation Guide:
https://docs.nvidia.com/datacenter/cloud-native/container-toolkit/latest/install-guide.html
https://docs.nvidia.com/datacenter/cloud-native/container-toolkit/1.12.0/install-guide.html
6. Install AI Application Container and Jupyter Notebook
In this section, we are going to demonstrate how to pull and install a container image for a specific application purpose.
Theoretically, GPU users can develop an AI or data science application from scratch on their own, but practically, the time and efforts required can be greatly reduced for development based on the existing open software resources.
There are a lot of open software resources on websites. One such site is NVIDIA NGC, which hosts a catalog of GPU-optimized AI software, SDKs, and Jupyter Notebooks, etc. that can greatly help accelerate AI workflows and offer support through NVIDIA AI Enterprise.
Before accessing NGC, you will need to create an account on the NGC container registry:
- Go to https://ngc.nvidia.com and in the top-right corner, click Welcome Guest > Sign in/sign up.
- Enter your email address and click Continue.

Figure 14. NGC user account registration - After entering your email to sign in, you will be brought to the “Create Your Account” page as below. Enter your account information as necessary.
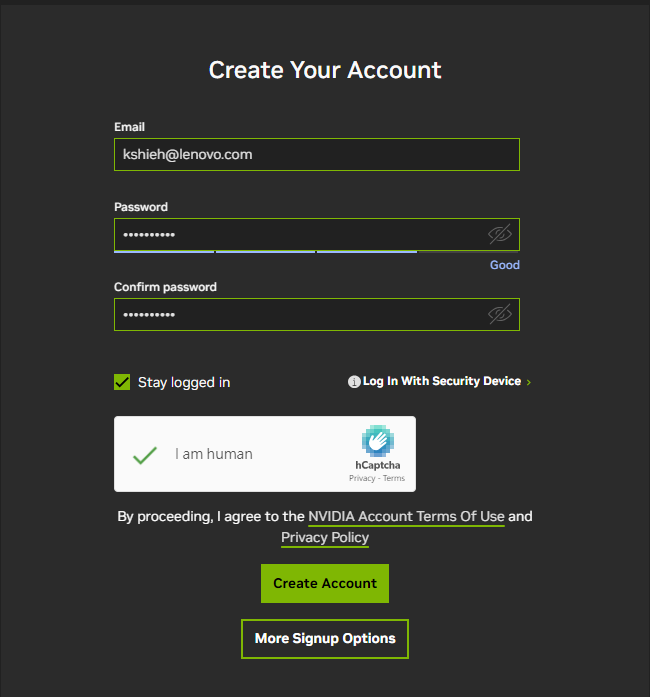
Figure 15. Create your account on the NGC - Enter your profile information and accept the NVIDIA GPU Cloud Terms of Use to activate your NGC account.
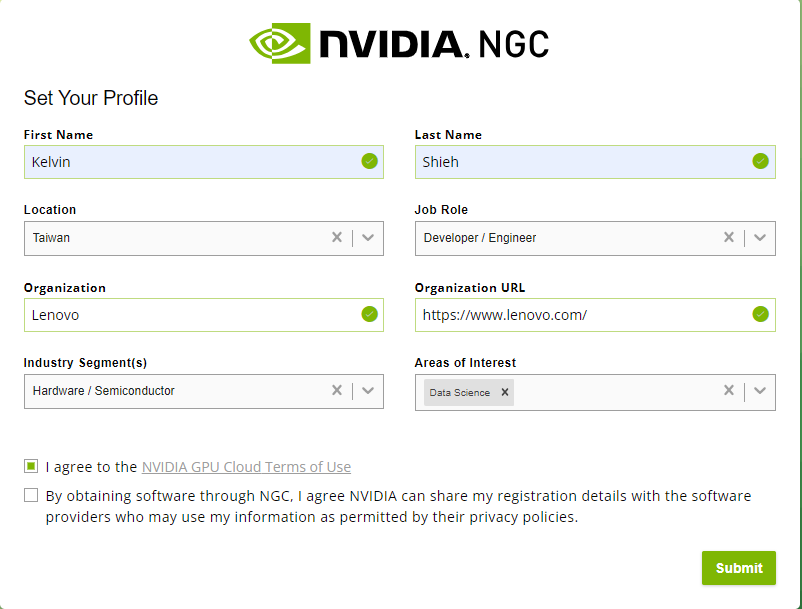
Figure 16. Enter your profile and accept the terms to activate the NGC account - Now sign in again to the NGC sign in website, https://ngc.nvidia.com/signin and click your user account icon in the top right corner and select “Setup”.

Figure 17. User login and setup - Click “Generate Personal Key” from the available options when below page shows up. Be sure to save the generated key to a secure place for future use.
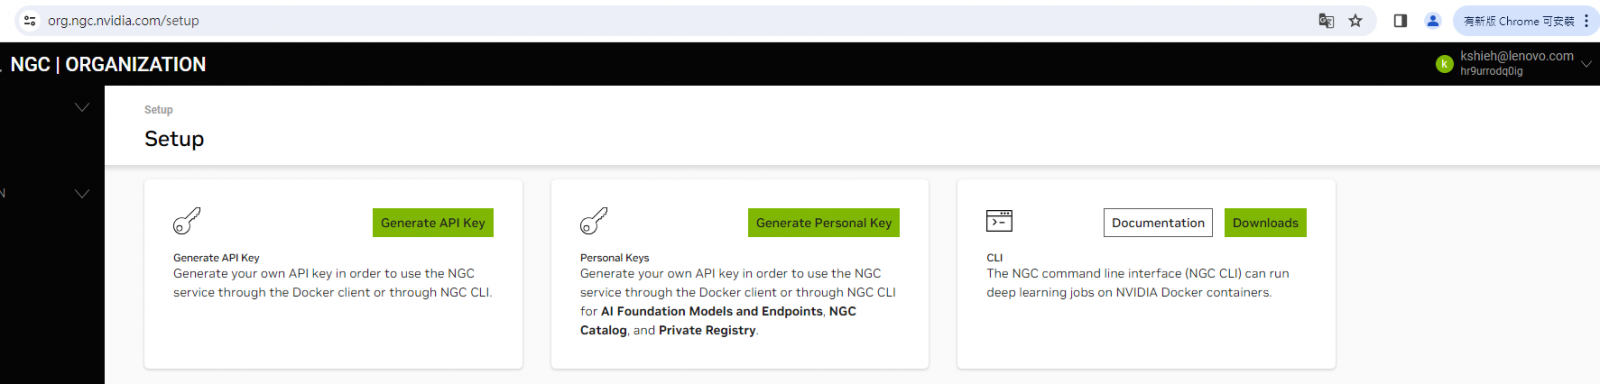
Figure 18. Generate Personal Key
Now that you have created an NGC account and obtained an NGC API key, you are ready to download (pull) an NGC TensorFlow container from NVIDIA NGC site and run that container using Docker.
Follow the steps below:
- Log in to the NGC container registry in a command shell:
$ sudo docker login nvcr.io - When prompted for your username, enter the following text (exactly as is):
$oauthtokenThe $oauthtoken username is a special user name that indicates that you will authenticate with an API key and not a username and password.
- When prompted for your password, enter your NGC API key (the NGC API key that you just generated).
Username: $oauthtoken Password: k7cqFTUvKKdiwGsPnWnyQFYGnlAlsCIRmlP67Qxa - Go to the NGC containers catalog page, https://ngc.nvidia.com/catalog/containers
- Search for “TensorFlow” and click the Learn More button in the TensorFlow card as highlighted in the figure below.

Figure 19. Search for the TensorFlow container image in the NGC Catalog - The different versions of TensorFlow container images will be listed under the “Tags” tab of right-hand side panel of the webpage, as in the figure below. The latest version is recommended since it may fix some of the known issues in prior versions. A general description about this container image can be found in the left-hand side panel of the webpage, while more detailed information and suggested further readings can be found under the “Overview” tab of right-hand side panel.
Click the icon and copy the pull command for the selected version of TensorFlow container image.

Figure 20. Copy the pull command for the selected version of TensorFlow container image - Paste the pulled command into the command shell to download the selected version of TensorFlow container image. For our lab testing, we downloaded tensorflow: 24.02-tf2-py3.
$ sudo docker pull nvcr.io/nvidia/tensorflow:24.02-tf2-py3 - Once the container download is completed, run the code below to start the TensorFlow container:
$ sudo docker run -it --gpus all -p 8888:8888 -v $PWD:/projects --network=host nvcr.io/nvidia/tensorflow:24.02-tf2-py3
Figure 21. Run the TensorFlow container image
Now we are in the container runtime.
As this container image is not installed with Jupyter, we install and run it within the container, as described in the following steps:
- Install Jupyter Lab within the container
$ pip install jupyterlab
Figure 22. Jupyter Lab is installed within the container - We are using the matplotlib to plot the pictures in the Jupyter Lab when running the image classification application, also need to install it with the command below:
$ pip install matplotlib - Start the Jupyter Lab server with the following command:
$ jupyter lab --ip=0.0.0.0 --port=8888 --allow-root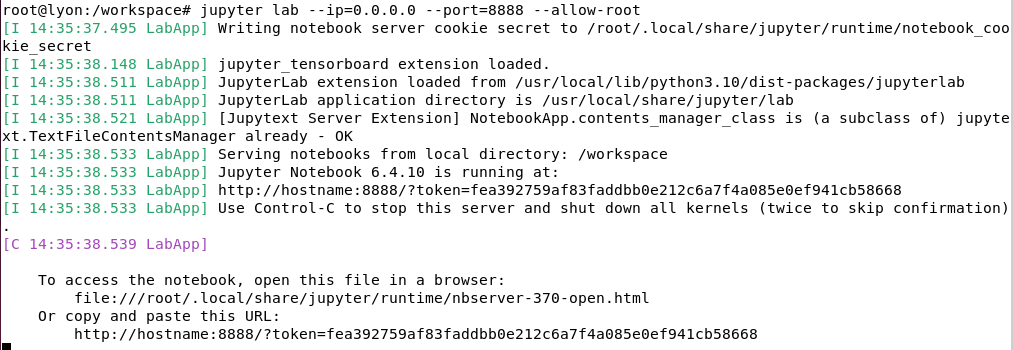
Figure 23. Jupyter Lab is started within the container - Open a browser at the following URL to use graphic web UI with Jupyter Lab, where yourtoken is the token ID number that is shown when you started Jupyter, as shown in the last line of the preceding figure.
http://localhost:8888/?token=yourtoken
Based on the token ID in the preceding figure, the URL will be:
http://localhost:8888/?token=fea392759af83faddbb0e212c6a7f4a085e0ef941cb58668The browser loads to the Jupyter Lab application as shown in the figure below.

Figure 24. Jupyter Lab shown in the browser - Click on the plus icon to launch a new Python 3 notebook.
In the next section we are going to run an image classification AI application container with the TensorFlow framework.
Reference:
For more details about how to get started to pull a container from NGC, refer to the following pages:
https://catalog.ngc.nvidia.com/orgs/nvidia/collections/gettingstarted
https://docs.nvidia.com/deeplearning/frameworks/user-guide/index.html#pullcontainer
Running the AI Workloads
In the preceding sections, we described how to deploy all necessary software packages for running a typical AI application container. In this section, we describe running a typical AI application which classifies images of clothing.
In this section, we use Jupyter Notebook to describe the full process of running “Fashion-MNIST Image Classification” with TensorFlow, step by step.
- Import Tensorflow, Keras, numpy and matplotlib
In [1]: # Import Tensorflow and check version import tensorflow as tf # Import TensorFlow Keras from tensorflow import keras #Import numpy import numpy as np #Import matplotlib import matplotlib.pyplot as plt - Import and load data set for model training and inference
In [2]: # Import the dataset. fashion_mnist = keras.datasets.fashion_mnist In [3]: # Load data set as four numpy arrays: (train_images, train_labels), (test_images, test_labels) = fashion_mnist.load_data() # For training the model, we will use train_images and train_labels arrays. # To test the performance of the trained model, we are going to use the test_images and test_labels arrays. - Explore the data set
In [4]:
print(f'There are {len(train_images)} images in the training set and {len(test_images)} images in the testing set.')

Out[4]:
There are 60000 images in the training set and 10000 images in the testing set.
In [5]: print(f'There are {len(train_labels)} labels in the training set and {len(test_labels)} labels in the test set.') Out[5]: There are 60000 labels in the training set and 10000 labels in the test set.In [6]: print(f'The images are {train_images[0][0].size} x {train_images[0][1].size} NumPy arrays.') Out[6]: The images are 28 x 28 NumPy arrays.In [7]: # The images are labeled with integers ranging from 0 to 9. train_labels[0:20] Out[7]: array([9, 0, 0, 3, 0, 2, 7, 2, 5, 5, 0, 9, 5, 5, 7, 9, 1, 0, 6, 4], dtype=uint8)In [8]: label_cloth_dict = {0:'T-shirt/top', 1:'Trouser', 2:'Pullover', 3:'Dress', 4:'Coat', 5:'Sandal', 6:'Shirt', 7:'Sneaker', 8:'Bag', 9:'Ankle boot' } In [9]: def label_name(x): return label_cloth_dict[x] In [10]: # Let's have a look at one of the images. The following code visualizes the images using the matplotlib library. plt.figure() plt.imshow(train_images[0]) plt.colorbar() plt.show() Out [10]: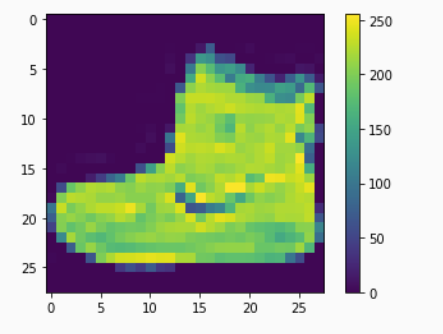
Figure 25. The first image from the training setIn [11]: # Let's look again at the first ten images, but this time with the class names. plt.figure(figsize=(10,5)) for i in range(10): plt.subplot(2,5,i+1) plt.xticks([]) plt.yticks([]) plt.grid(False) plt.imshow(train_images[i], cmap='Blues') plt.xlabel(label_name(train_labels[i])) plt.show() Out [11]: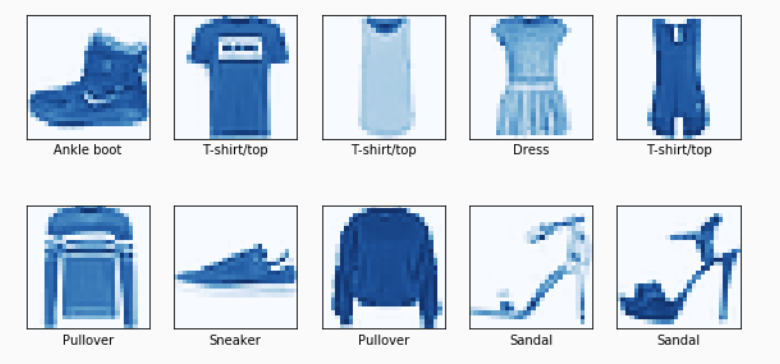
Figure 26. The first ten images from the training set with the class namesIn [12]: # The pixel values range from 0 to 255. # Let's divide the image arrays by 255 to scale them to the range 0 to 1. train_images = train_images / 255.0 test_images = test_images / 255.0 - Build the image classification model
In [13]: # Let's build the model: simple_model = keras.Sequential([ # Flatten two dimansional images into one dimansion 28*28pixles=784pixels. keras.layers.Flatten(input_shape=(28, 28)), # First dense/ fully connected layer: 128 nodes. keras.layers.Dense(128, activation='relu'), # Second dense/ fully connected layer: 10 nodes --> Result is a score for each images class. keras.layers.Dense(10)]) - Compile the model
In [14]: # Compile the model: # Define loss function, optimizer, and metrics. simple_model.compile(optimizer='adam', loss=tf.keras.losses.SparseCategoricalCrossentropy(from_logits=True), metrics=['accuracy']) - Train the model
In [15]: # Train the model: # Let's train 15 epochs. After every epoch, training time, loss, and accuracy will be displayed. simple_model.fit(train_images, train_labels, epochs=15) - Test the model and check the model performance on the test data
In [16]:
# Let's see how the model performs on the test data:
test_loss, test_acc = simple_model.evaluate(test_images, test_labels)

Out[16]:
313/313 [==============================] - 0s 542us/step - loss: 0.3482 - accuracy: 0.8836
We successfully trained our first model and used it to make predictions on test data, based on all the prior installed software packages.
For more information
For more information see these resources:
- NVIDIA CUDA driver:
https://docs.nvidia.com/datacenter/tesla/index.html#nvidia-driver-documentation
https://docs.nvidia.com/datacenter/tesla/drivers/index.html - NVIDIA Container Toolkit:
https://docs.nvidia.com/datacenter/cloud-native/container-toolkit/latest/ - Containers For Deep Learning Frameworks User Guide:
https://docs.nvidia.com/deeplearning/frameworks/user-guide/#pullcontainer - NVIDIA NGC Catalog:
https://ngc.nvidia.com/
https://docs.nvidia.com/ngc/index.html#primary-documentation
Author
Kelvin Shieh is the OS Development Technical Lead for the Lenovo Infrastructure Solutions Group, based in Taipei, Taiwan.
Related product families
Product families related to this document are the following:
Trademarks
Lenovo and the Lenovo logo are trademarks or registered trademarks of Lenovo in the United States, other countries, or both. A current list of Lenovo trademarks is available on the Web at https://www.lenovo.com/us/en/legal/copytrade/.
The following terms are trademarks of Lenovo in the United States, other countries, or both:
Lenovo®
ThinkSystem®
The following terms are trademarks of other companies:
Intel® and Xeon® are trademarks of Intel Corporation or its subsidiaries.
Linux® is the trademark of Linus Torvalds in the U.S. and other countries.
Other company, product, or service names may be trademarks or service marks of others.
Configure and Buy
Please select a locale


